


Building a Horse Shelter
 Aug 01, 2016|
 View:2323
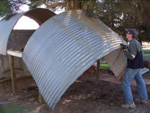
If you are lucky enough to own a horse, a simple structure with an enclosure will shelter it from the weather and make it easier to manage. In a previous project, a basic bush shed had been built using an old rainwater tank. It was decided to convert this into a shelter/yard for a miniature horse. It was built to “full scale” so it would accommodate large horses as well.
When planning, select a site where the shed opening can face away from the prevailing weather. Also consult your local council to see if planning permits are required. For this project, the structure was built up against an existing shed. This provided one readymade wall.
 |  |  |  |
 |  |  |  |
 |  |  |  |
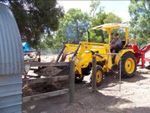
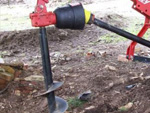
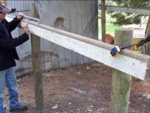
Two rows of pine posts (3 in each row) were installed with the help of a PTO driven post hole digger. A beam was then attached to both rows of posts using coach screws. An old rainwater tank was then cut in half and the two halves were attached to the beams using roofing screws. Finally walls were constructed using sheet metal.
The next part of the project was to create a simple post and rail enclosure. This makes it easier to control the horse when grooming, saddling up etc. Also it enables you to lock the horse up if it is getting too much feed from the paddock. This location was ideal as a nice tree provides afternoon shade. The size of this enclosure was around 6m x 4m.
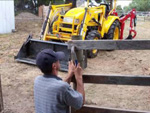
150mm diameter pine posts were put in using the post hole digger again. Holes were dug to a depth of 600mm, the poles were dropped in and the soil compacted in with a crow bar. A level was used to ensure the posts were vertical. Two gates were to be added – a small gate to walk in and out of and a larger gate for vehicular access if required. Post spacings allowed for the two gates.
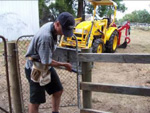
Next railings were attached to the posts using some old 50mm x 100mm hard wood. Three railings were used but two would have probably sufficed for this little horse! The timber was pre drilled to prevent splitting and then secured with 125mm nails. Note railings need to be attached on the inside of the posts rather than the outside so that your horse cannot push them off.
The two gates were hung as follows. A pivot pin was attached to the bottom of the post for the gate to swing on and a hook fitted at the top of the post keeps the gate in place. The gate is finished off with the gate latch on the opposite post.
To keep the area from getting too muddy under foot a very basic cut off drain was installed and wood chippings were put down.
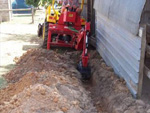
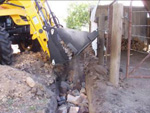
As the structure is built on a slight slope, the purpose of the drain is to “cut off” surface water from running down the hill and into the enclosure. This did not have to be a perfect job so an old fashioned rubble drain was used. A 400mm deep trench was dug with the back hoe – digging until you hit clay will make the drain much more effective. The side shift feature on the backhoe made it possible to dig close to the structure.
Warning: Check that there are no services such as electricity, gas, phone or water underground in the area where you plan to dig. If in doubt there is a service called “dial before you dig” to identify underground lines. Dial 1100 or visit www.dialbeforeyoudig.com.au
The trench requires a slight fall to allow water to flow away. The fall can be checked with a spirit level placed on a long straight piece of timber and should be approximately 1 in 100. This means for every metre (100cm) the trench goes across it needs to become 1cm deeper.
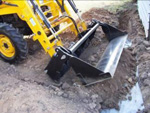
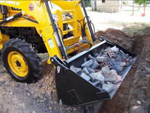
At the end of the trench, a pit roughly a metre square was dug to enable the water to soak away. Then rubble was dumped in the trench and pit using the tractors front end loader. Using the 4-in-1 feature that opens and closes the bucket in the middle makes it easier to place a little in at a time. Note this is a very basic drain – to see a more conventional drain design refer to the ‘How To’ drainage article.
The rubble consisted of broken bricks and rocks that had to be disposed of. Try to put the larger rubble in the bottom and the smaller stuff on the top. Some geo-fabric was then laid down. This minimise soil falling into the rubble but still allows water to pass through.
The trench was then filled by pushing some of the soil back with the front end loader. A shallow layer (50mm) of soil will provide better drainage. If you dug up clay avoid putting this back in the trench as it will prevent water from soaking into the drain. Hand raking the soil into a concave shape will also help cut off surface water.
Finally the 4-in-1 loader bucket was used to scoop and spread the chippings in the yard. To contain the chippings in the yard planks of wood were nailed to the bottom of the posts.
Safety is always the highest priority. Always use a tractor that complies with Australian Standards, including Roll Over Protective Structure, seat belt and protective covers. Only take on tasks within the capability of the machine and operator. Follow all relevant safety warnings, instructions and regulations. Wear appropriate safety equipment and use common sense.
* This article is a general guide only. Conditions vary from site to site. Judgement relating to your individual conditions must be exercised.


View More(Total0)Comment lists